How do I learn in the document templates in PaperOffice?

Philipp Kaestner
Created: 20.11.2018 9:04 - Updated: 01.08.2019 11:48
Thanks to the AI-based Intelligent Storage, PaperOffice can automatically recognize all your documents as well as index them, read out complete content and then automatically place them in the correct destination folder.
Complete the required fields on your own, link them with contacts, deposit notes and do all the work that normally would otherwise be laborious and time-consuming.
The entire document template learning process is also described in our YouTube video in detail.
Intelligent storage is provided by the PaperOffice integrated AI "PIA" - "PaperOffice Intelligent Automatization".
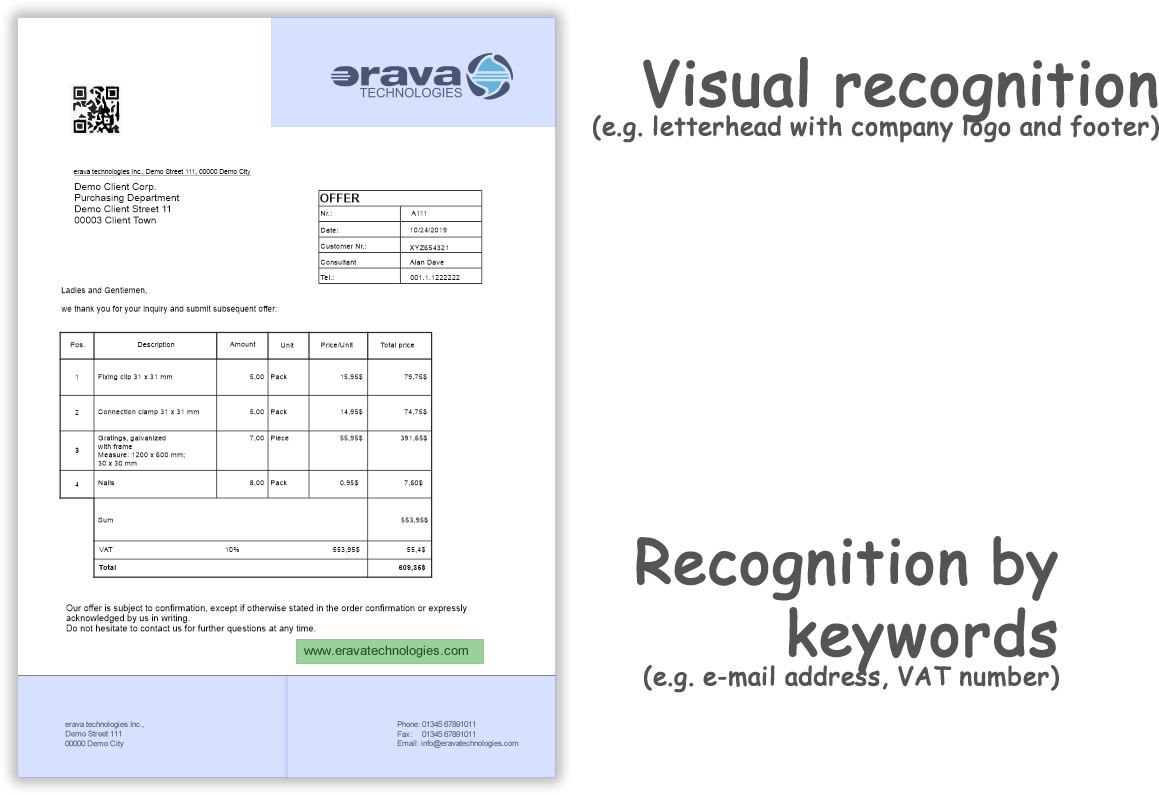
The learning in of the document templates is done via 2 recognition features: the visual recognition, such as a letterhead with a company logo and the keywords recognition, e.g. an email address or VAT number. Although the visual recognition can be optional, however keyword recognition is mandatory.
Why do document templates have to be learned in?
Thanks to the learning in of document templates, your documents can be automatically assigned and, if necessary, even archived and tagged without your further involvement.
PaperOffice PIA can also independently find, read, and tag specific document values.
In addition, various storage masks can be defined in the next step in order to completely tag and file your documents. These are described in another workflow.
To run the automatic storage, start PaperOffice and drag and drop a document.
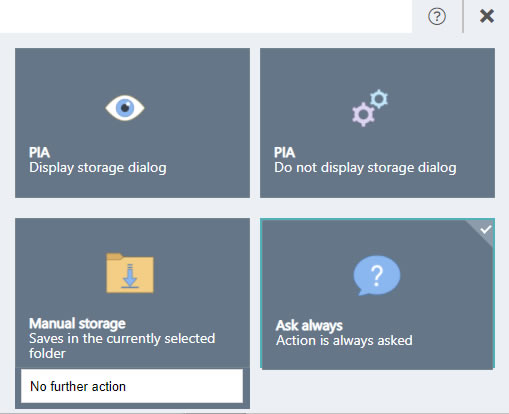
Please note that to learn in the document templates, the PIA mode should be set to "Display storage dialog":
Of course, you can also apply automatic storage to a scanned document.
Please note that the scanned document should be scanned with a resolution of at least 300dpi, the document also should be straight positioned in your scanner and should be displayed in full.
You get the best results, if you scan the document template in the same way as you will scan all subsequent documents.
This means that if you have scanned and learned in an invoice through the ADF, you should also scan the follow-on invoices - which should be recognized too - through the ADF.
In particular, inexpensive devices often go wrong about the automatic document feed.
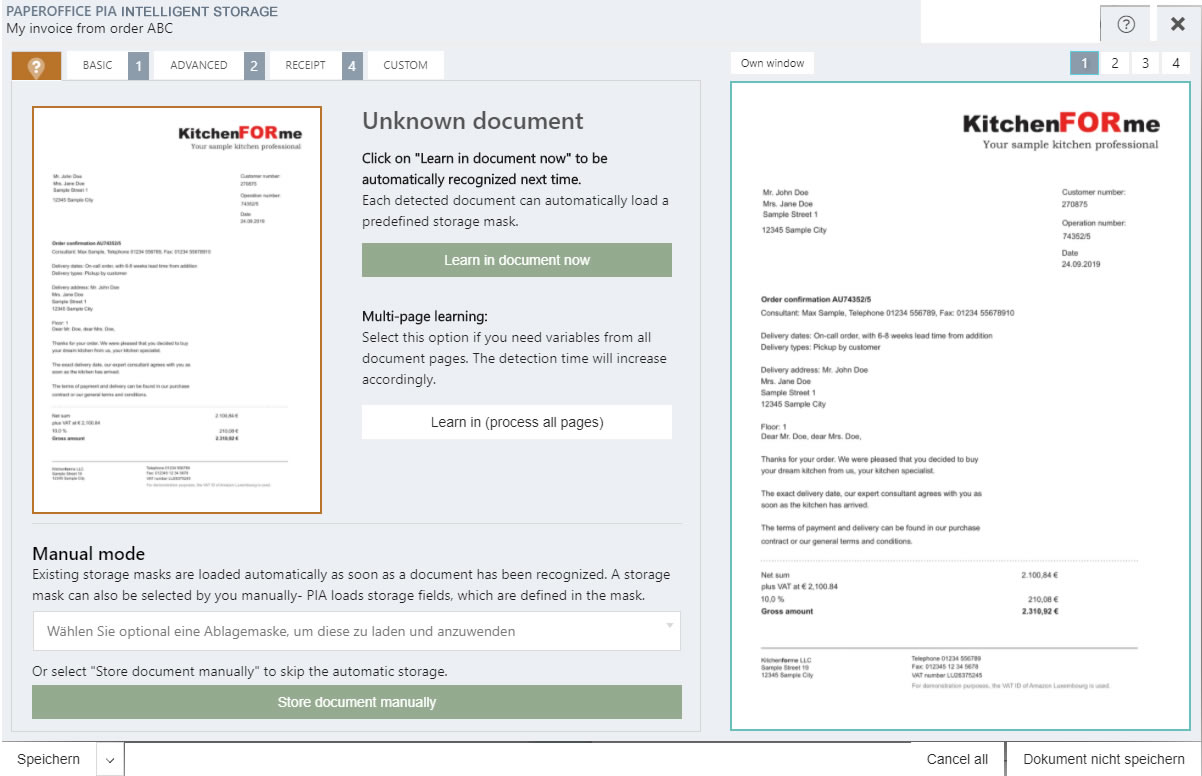
Start the learning process
After the document is dragged into the PaperOffice interface or otherwise added, PaperOffice starts the recognition process.
The process takes a brief moment.
Please note that the visual recognition process as well as by existing keywords are performed ONLY from the first page.
The function of reading and providing variables (REGEX) is performed from all pages for multi-page documents.
If you have a multi-page document and want to read variables from all pages, click "Learn in (process all pages)". The process will then be executed for all pages.
Now click on "Learn in document now" to start the learning process for automatic storage.
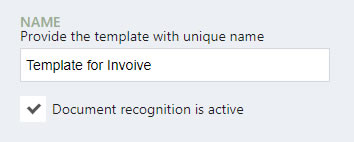
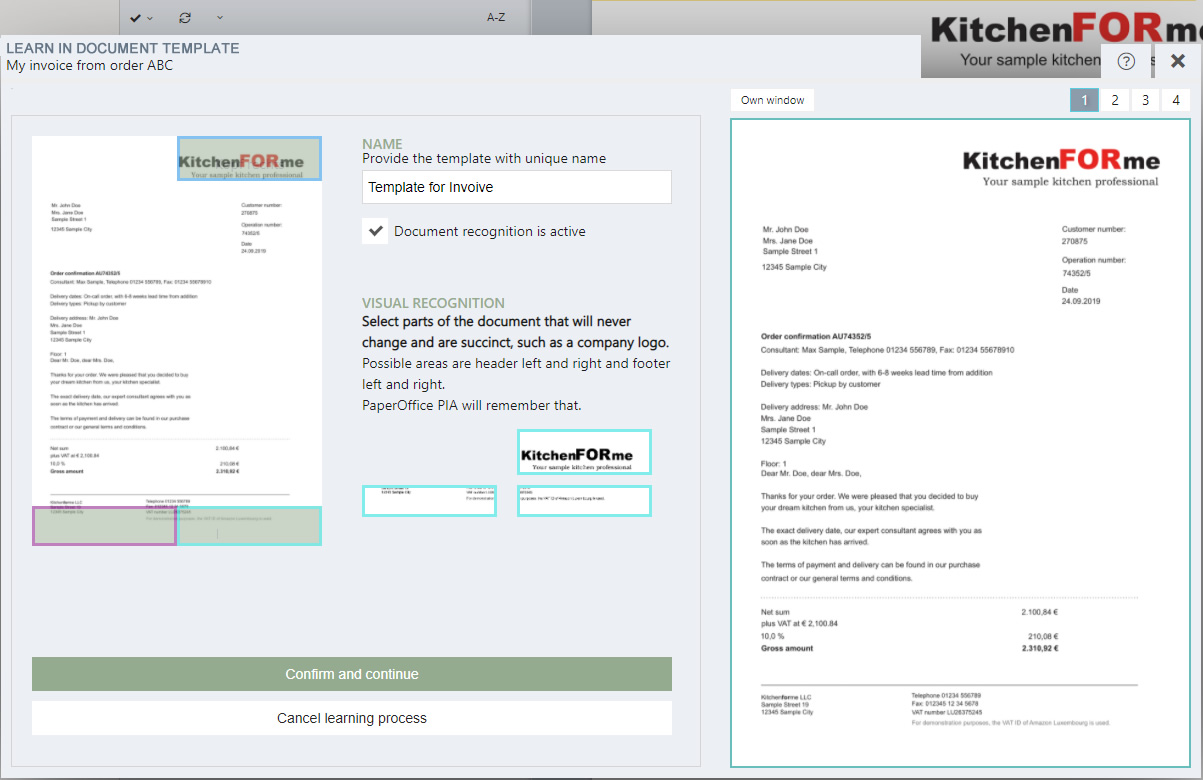
First assign a unique name for the document template. Check that the check mark next to the "Document recognition is active" field has been set. This means that the intelligent recognition of the current document template has been activated and it will recognize the document at the next save operation as well as meeting all set recognition characteristics.
You can always disable automated detection later in your settings.
Recognition feature 1 - Visual recognition
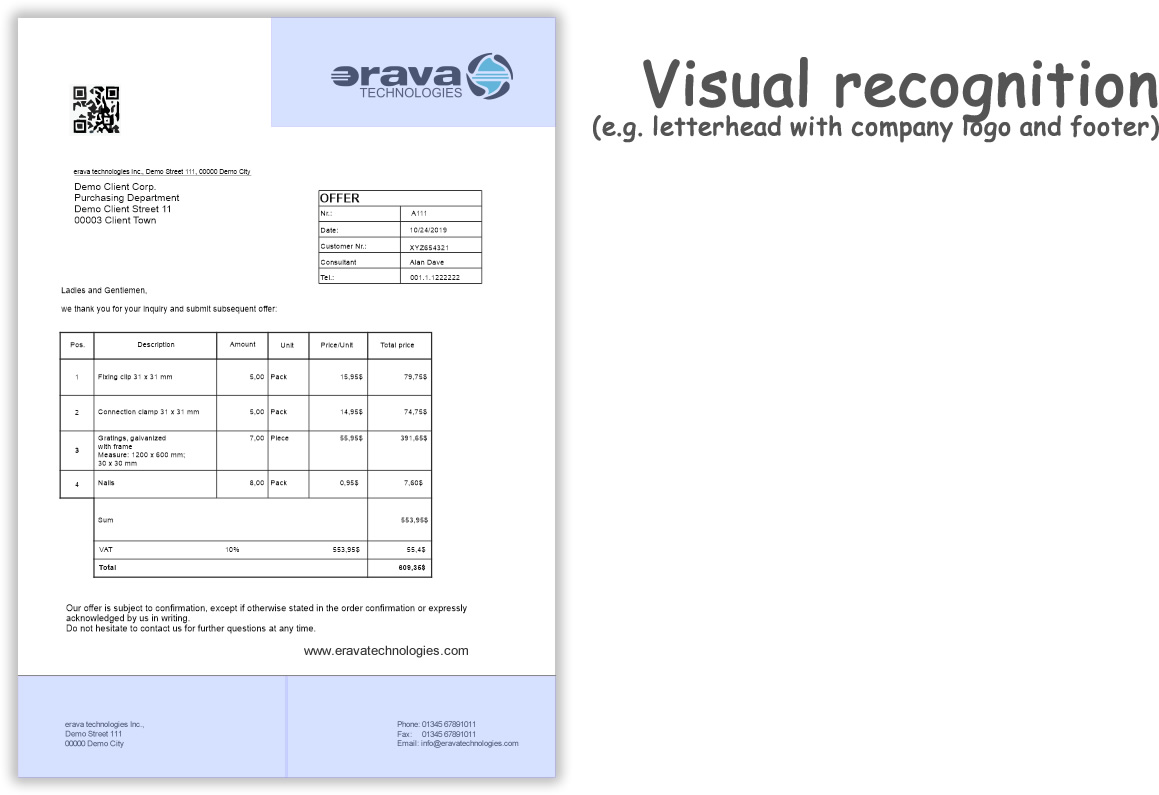
Mark those areas of the document that always remain the same, such as the area with the logo or deposited account details, by clicking on these areas with the left mouse button. To deselect the area, click on it again with the left mouse button.
Once the option of visual recognition of various areas of the headers and footers has been activated, depending on the resolution and quality, they will be deposited as recognition features in PaperOffice.
You can view document areas enlarged at any time by hovering over them with the left mouse button to activate zoom mode.
You can also open individual pages in full screen by selecting the appropriate page and clicking the "Own window" button.
After the document template has been uniquely named and, if necessary, visual recognition has also been set, click on "Confirm and continue".
You can cancel the learning process at any time by clicking "Cancel learning process"
Recognition feature 2 - Recognition by existing text or keywords
The basis of simple document templates are keywords, which must occur in the document so that the assignment takes place according to the default. Unlike various DMS programs, each document is considered separately, i.e. document-specific and not only general keywords are seen as variables and loaded into the right window.
Please note that for this type of recognition, only keywords found on the first page are considered and thus loaded.
Clicking on one of the words will transfer it to the left window for automated filing.
After the word or words have been transferred to the left window, you can change them manually at any time by clicking the left mouse button in the corresponding field and correcting the keyword. If one of the keywords is no longer recognized, you can also easily delete it from the left window.
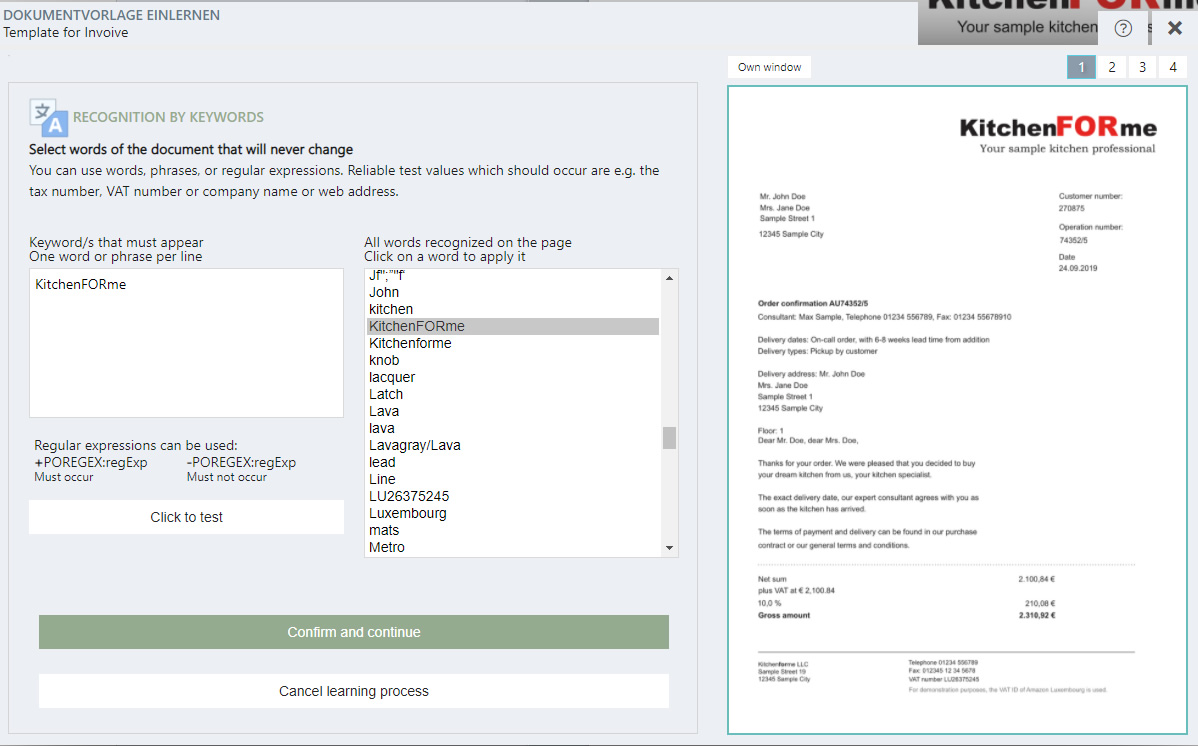
The document template will only be recognized and executed if the document in question exactly contains all these keywords. Thus, store only those words that occur in the current document and will not change in the upcoming documents, also note the case sensitivity - the keyword you entered MUST appear exactly the same on the document.
In this step, you can optionally work with REGEX calls. This way you can narrow down the results exactly.
A combination of REGEX and simple keywords is thus possible. All keywords specified here must occur completely and in the same notation in the document for the document template to take effect. It is best to use unique terms, such as a customer number, email address or even the sales tax ID.
As with visual recognition, you can have individual areas of your document enlarged by moving the mouse over desired areas of your preview image.
You can test all stored keywords at any time by clicking on "Click to test". The green highlighted notification tells you that all keywords have been found in this document and will be considered for the document template.
After all keywords have been set, click "Confirm and continue" to proceed.
Read and provide variables
The PaperOffice AI can find certain document values completely independently, read them out and provide them as variables.
PaperOffice PIA extracts all the raw text from the document and puts it like a layer over the transparent preview view of your document. Thereby PaperOffice tries to preserve the document - layout as best as possible.
To read out one of the variables and make it available for future recognition, move the mouse in the right window over a text container that you want to read out. The text container will be marked yellow.
The small adjacent window shows the positioning and contents of each text container.
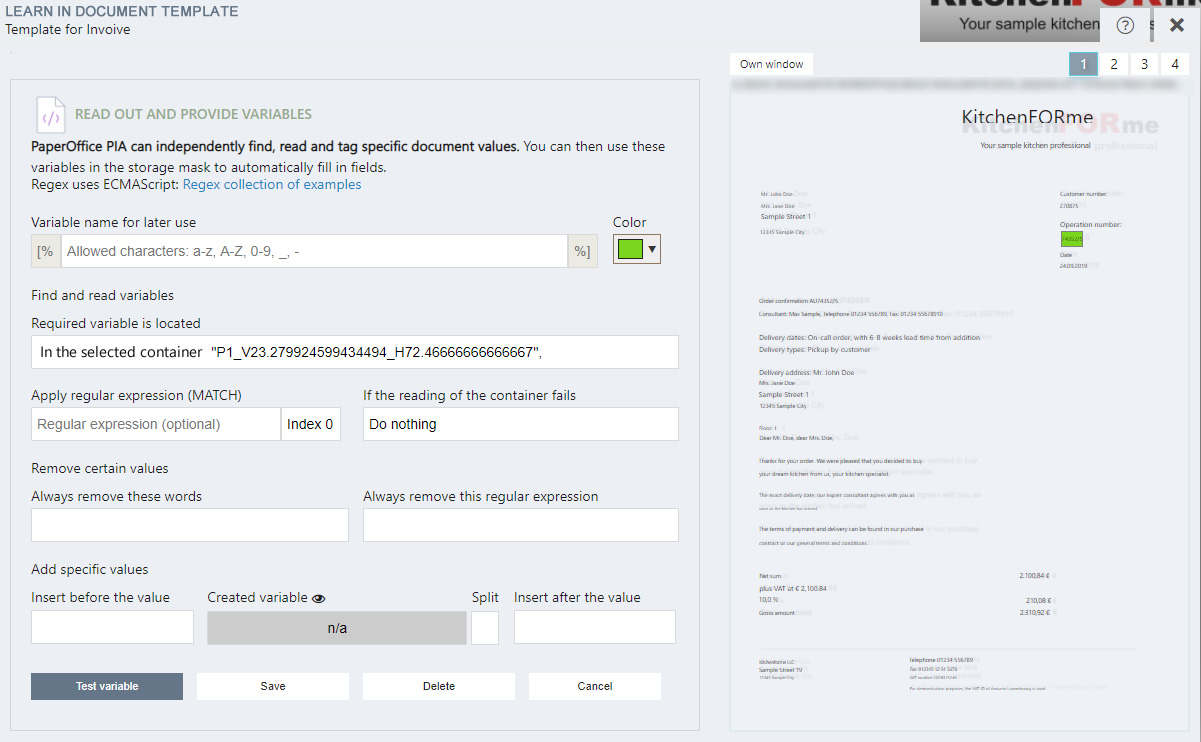
For example, you can search for the invoice amount of each document or have the purchase contract number applied for recognition.
Click on a text container whose variable you want to read and provide.
The background color of the text container changes to "green".
Now you can assign a variable name for later use. Please use only allowed symbols and no spaces.
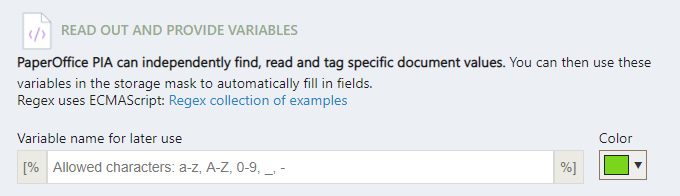
Assign any color for the variable.
In the next step, you can specify where the variable is located in order to read it. The desired content of the text container does not always have to be in the same position.
- So you can select; "In the selected container, which is always exactly in the same position". In this case, the exact position will be automatically calculated and displayed by PIA. Select this option if your variable is always in the same position.
- In case the positioning of your variable can change depending on the document, but it is always located between two specific groups of words, so choose the second option "In the container located between the containers with the "previous value" and then "coming value"". Like, for example, a delivery date that you would store as a variable later in the storage mask for resubmission or due date.
- In case the variable is neither in a specific position nor between two words, select the option "Somewhere in the entire document".
This option is very suitable for reading final amounts. In doing so, you create the document template based on an invoice or a quote and you have to take into account that the final amount can be located on any document page. As with the previous options, a variable name must also be assigned for this. - The third option ONLY takes effect in conjunction with REGEX expressions. Click on "Regex collection of examples."
Some sample expressions are listed, which you can use at any time. Click on the appropriate icon to copy the expression to the clipboard.
Paste it with CTRL+V into the corresponding line. If multiple hits may occur within a document page, click on "Index" and select the appropriate order. Please note that the first hit starts with "Index Null". In the "Remove specific values" area, specify which values should be removed.
In exactly the same way, you can specify whether certain values should be added.
Save the settings.
After you have added all the variables to be read, click on "Confirm and continue".
The variables you have just created can also be used later in the storage mask area.
Confirm all the settings.
Congratulations! PaperOffice will now recognize the predefined document template based on the recognition characteristics you set.
Now save the document template to define a storage mask for it. What a storage mask entails, how to create one or edit existing ones, and how to connect them to the created document templates is explained in a separate workflow or by accessing the corresponding video on YouTube.
To manage document templates, do so by going to your settings and selecting "Document templates and storage masks". Click on "Manage document templates." The list of recently added document templates will appear.
The "Is used" column shows which document templates are currently active. To set a document template to inactive, click on the corresponding one in the list and select "Edit document template".
In the "Document recognition is active" area, uncheck the box and confirm all other entries until you get to the last step. Confirm this as well.
The icon has changed - this document template is not currently in use.
Fast recognition means that only the first page of the document is detected.
The Storage Mask column lists which document templates have been associated with a storage mask. If any storage masks have been stored by you, they can be easily assigned in this administration window. Select one of the document templates and click in the selection field in the lower area "Connected storage mask". Select a storage mask.
In the "Read variables" area, which you can view by clicking the slider, the number of variables read out is displayed.