MailConnect settings
.

Peter Hertz
Created: 05.04.2018 2:58 - Updated: 26.04.2021 16:32
MailConnect - POP3 monitoring
With MailConnect, thanks to the POP3 monitoring , you can archive your emails, including attachments, automatically, legally and directly from the mail server.
Please note: MailConnect - POP3 monitoring is the module integrated from the PaperOffice 2020 version and part of the PaperOffice Plus Online Services. To use PaperOffice Online Service you need the latest release for compatibility reasons.
Store your own existing email accounts and link them with various storage masks in order to carry out automated email archiving.
You can have current and existing emails automatically archived including their attachments or without them. Thanks to MailConnect you come very close to the goal of a paperless office.
MailConnect settings
POP3 access data - username
First, enter the user name of your POP3 account in the input field provided.

POP3 access data - password
Then enter the password you saved for the POP3 server in the lower input field.
POP3 access data - server address (port 995, TLS activated)
Now enter the server host address. PaperOffice will try to connect on port 995. Make sure TLS is available on port 995.
POP3 access data - security
In this area of TLS security click in the selection list and select the required security level. If you have general problems with the server connection, we recommend that you set the security to "Low security" or "Disabled". In other cases, we recommend leaving this on "High Security".
Archiving options
Archiving strategy : First select a mode in the archiving strategy area by clicking on the select list.
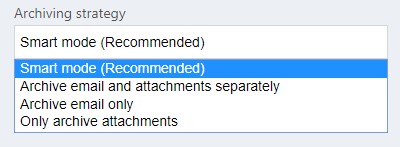
Intelligent mode (Recommended) : The attachments of your email (if available) are saved in PaperOffice and the original email for the document (the attachment) is stored as a separate icon in the advanced option of the document preview.
In this way, you can guarantee audit-proof email archiving at any time, since the origin of the email as well as the attachment can be traced at any time, thus ensuring tamper-proof archiving.
Archive email and attachments separately : If you select this option, the original email and the email attachments (if any) are archived for each email.
Archive email only : If you select this option, the original email will be archived without attachments.
Archive attachments only : If you select this option, the attachments (if any) will be archived without the original email.
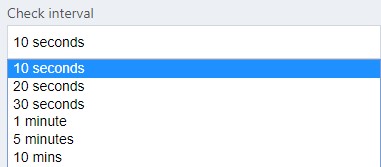
Check interval : Define a check interval by clicking with the left mouse button in the selection list and selecting an entry.
You can choose whether the automated check should be carried out every “10 seconds” or, accordingly, “every 10 minutes” for new incoming emails.
Do not archive if these words ...:
Enter a word or several words in the appropriate field - this way the emails with the specified terms in the subject will NOT be archived in PaperOffice . Please note that your information is case-sensitive.
This password is required in the subject :
Enter a password in the next field, which is required in the subject. So the sender has to include this password in the subject line so that you can receive it. Please note that your information is case-sensitive.
Before you save your information and carry out the test run of the POP3 address you have just stored, it is important that you define the storage mask as the next step for this address.
Storage mask: PaperOffice Intelligent Automation (PIA)
The PIA module integrated in PaperOffice helps you with the automated processing of your emails and files. As a next step you can define the storage method for your POP3 address:
- Display storage dialog: New documents are analyzed by PIA, automatically tagged and displayed for completion.

- Only if unknown: As "Dislay storage dialog", but the PIA storage dialog is only displayed if the document could not be recognized.
- Use server mode: PIA is started in the background, automatically stores all documents in the background and is only displayed in the event of errors. Activate the option button if you want to use a specific storage mask for your POP3 monitoring and select the necessary storage mask from the list as the next step.

- Switched off and optimized for bulk imports: PIA is not used and new documents are stored directly in the target folder without analysis. Activate the radio button and, as the next step, select a specific folder for storage by clicking on the "Select from folder list" button.
Now select the folder directly in the folder tree and click on it with the left mouse button.
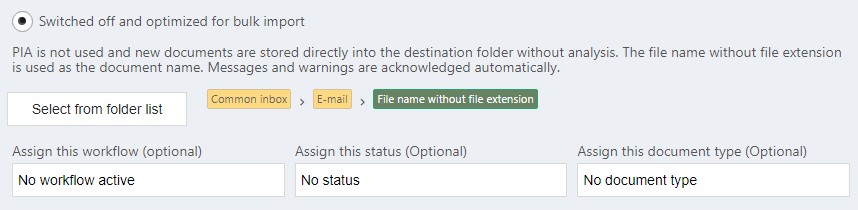
Assign thisworkflow : In addition to the standard folder from the previous step, you can also assign a workflow. This workflow is activated automatically as soon as the document is stored in the folder. This assignment is optional.
Assign this status : Assign status: Activate this option if you want to automatically assign a document type by selecting it from the selection list. The status can only be assigned if you did not select a workflow in the previous step or if the workflow you selected does not contain an automatic action, such as the assignment of a document status. This assignment is optional.
Assign this document type : Activate this option if you want to automatically assign a document type by selecting it in the selection list.
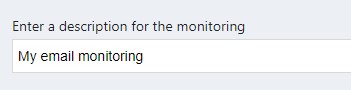
Enter a name for the monitoring
Now enter the name for the POP3 monitoring. The designation is shown to you in the previous table when listing all of your existing intelligent monitoring systems.
Test POP3 connection
Scroll up again until you see the button labeled "Start test: Retrieve, process and delete the first available email". Click on this and save your page on the next prompt.
If you have entered your POP3 credentilas correctly, the green message about a successful connection will appear after the test:

Activate POP3 monitoring
Your POP3 monitoring is not active and cannot be used until you check the box under the heading "Monitoring activated". Set the check mark with the left mouse button. If you want to deactivate your POP3 monitoring later or set it to inactive, remove the checkmark.
This completes your settings for your POP3 monitoring. You still have to add this monitoring by clicking on "Add".